Grief Syndrome


Grief Syndrome is a doujin game by Twilight Frontier (also known as Tasofro) which was released at Comiket 80 on August 13, 2011. It is a side-scrolling beat-em-up featuring the characters of Puella Magi Madoka Magica. 1 to 3 players can play with local (all gamepads/keyboards connected to the same computer) multiplayer.
Frequently Asked Questions
- Online multiplayer where?
- The game doesn't support online play. Earlier Tasofro games have had online multiplayer, so there may be some hope of an update if the game is successful.
- How do I play multiplayer?
- First you need to assign keys for other players using the configuration program. Then at the character select screen players 2 and 3 can join by pressing their select buttons (weak attack).
- Do I need an English translation?
- No, many things are already in English and the game is playable with no knowledge of Japanese.
- Error: d3dx9_43.dll not found
- Open the directx folder that comes with the installer and run DXSETUP.exe or download the dll and place it into game folder next to griefsyndrome.exe
- It still won't run.
- Try setting your system locale to JAP in the Region and Language Settings, then restart.
- How do you save the game?
- The game saves your lap and some statistics when you defeat Walpurgis Night. You can't save in the middle of a run or keep levels unlocked between runs. Make sure the game is in its default directory and that it has write permission.
- How do you use full screen?
- Alt+Enter. You can use the configuration program to enable the full screen feature.
- The kyubey icon/configuration program won't open even though the game is not running
- Set the compatibility mode to NT 4.0 and run the program as Administrator
- Is there a way to change the BGM?
- The BGM music data file is the one labeled GS01.dat. You will need an extractor/ dat compiler to do this
- How do I check my trophies?
- They can be found on the menu screen during game play.
Gameplay
Players begin a new game in Gertrud's level. They must fight through each level in sequence, defeating Gertrud, Charlotte, Elly, Elsa Maria, and Walpurgis Night. A bonus Oktavia level is unlocked if Sayaka dies. Magical girls cannot be resurrected when they run out of soul limit, except by restarting the game from the beginning and discarding all current progress.
Magical girls have health bars and soul limit counters. Permanent death occurs when the soul limit reaches zero. The health bar is recharged by consuming soul limit after taking damage. When the health bar becomes empty or the girl falls down a deadly pit, a percentage of her soul limit points is consumed to construct a new body for her. Using special abilities turns part of the health bar blue. No soul limit is lost if it recharges while still blue, but taking any damage during this period will turn the blue area into additional damage.
Defeating enemies causes the girls to level up, increasing their damage output and survivability. The maximum level is 99. The soul limit is fully recharged after defeating a witch.
Defeating Walpurgis Night completes a lap. One of many ending screens is displayed depending on which girls remain alive, and your game is saved. You can start a new game from the next lap. As lap number increases, enemy attack power and health increases, so the game becomes more difficult, but the girls will also level up more quickly. Unlike the girls, the bosses can have levels over 99. On the higher laps, their levels will even be in the thousands, if not tens of thousands.
The highest lap known to be unlocked so far is 458330. Lap numbers are unlocked based this formula: highest lap beaten squared plus one.
lap 1^2+1=2
lap 2^2+1=5
lap 5^2+1=26
lap 26^2+1=677
lap 677^2+1=458330
It is not technically possible to reach lap 458330^2+1=210 066 388 901 due to some modern day computer limitations (signed 32bit integers that cannot store values above 2,147,483,648). If you do beat lap 458330 the game hangs before displaying the staff roll. The highest lap number one can beat without freezing the game would be lap 46340, unlocking lap 2,147,395,601 (since 46341^2+1=2,147,488,282, which is slightly over the limit).
Controls
- Left, Right: Move sideways
- Up, Down: Aim or use alternate attacks in combination with the Z and X keys
- Z: Quick/Weak attack (select at menu screens)
- X: Strong attack (go back at menu screens)
- A: Special Ability
- C: Jump. Hold down and press C while standing on platforms to drop through.
- Q: Menu
- Esc: Menu
Some players use a number pad mapping terminology to name moves. For example, "8Z x2 j.6X" The first number is a position on the number pad: 8=up, 6=right, 2=down, 5=neutral, corresponding to how a joystick would work. The letter after it is the default key for that ability. x followed by a number means repeat it that many times. "j." means to do it while jumping.
At the menu screen during game play the options available are:
- Restart the game
- Return to the title
- Erase the menu
"Restart the game" just means resume playing. Can also be invoked by pressing the menu button. "Erase the menu" just means show the currently paused screen without the menu. Pressing back (strong attack) will bring you back to the normal menu. Return to the title does as stated.
Configuration
The program with a Kyubey icon allows you to configure the game. Make sure the game is not running when you use it.

Click the box of the key you want to change and then press the key you want to change it to. Pressing the Esc key will clear that key.
One popular modification is changing the jump key to space. The configuration program also allows you to mute the sound or enable full screen.
If the controls menu does not open, and you're not in Windows 7, try activating NT compatibility mode in properties. There has been a report of a bug that only allows one key to be changed at a time.
Characters
Madoka
|
Madoka |
||
|---|---|---|
 | ||
| Parameter | Base stat | Per level |
| Vitality | 92 | +4 |
| Power | 10 | +1 |
| Soul limit | 28875 | +128 |
| SL lost in revive | 9.6% | |
| Special cost | 45 | |
Madoka is a ranged attacker who relies on charging up abilities. She can use cheap tactics to rain destruction on enemies without allowing them any opportunity to fight back, and possesses a huge soul limit, but she is vulnerable to being interrupted while charging attacks, has a limited set of abilities, and her main attacks require precise aiming.
Abilities:
- Quick Attack: Fire a barrage of arrows. Holding the attack button down allows you to charge the attack up to 2 levels. Doing so increases the number of arrows fired. Holding up or down while starting the attack causes Madoka to aim upwards or downwards at 45 degree angles. Each arrow disappears after hitting once and has weak knock back. Pushes back both small and large enemies.
- No charge fires 3 arrows.
- 1 level charged fires 7 arrows.
- 2 levels charged (max) fires 14 arrows.
- Strong Attack: Fire a piercing arrow horizontally that knock back into a wall bounce. Holding the key down causes Madoka to charge up for higher damage and stronger properties.
- No charge pierces 2 enemies and hits a 3rd and has weak knock back.
- 1 level charged pierces any number of enemies and will hit enemies all the way into the wall.
- 2 levels charged (max) pierces any number of enemies and will hit enemies all the way into the wall. Has a much larger hitbox than the previous level of charge (can hit enemies standing on her) and does over twice as much damage.
- Special: Shoots a single arrow straight up, and then 60 arrows rain from the sky, damaging all enemies near Madoka, for a total of 61 hits. The shower will knock down enemies.
- Charging: While charging up attacks, Madoka can float in the air. She can do this indefinitely, staying out of an enemy's reach.
- Idle: Madoka looks super cute.
Review/Tips: Madoka has the most SL out of the characters, both starting and growth rate. Don't take her charging shots for granted, they are very effective in stunning/controlling mobs of enemies, especially with their knock back. All her moves essentially put the enemies in a stun state and do quick and rapid damage. To get out of a crowded situation you can fire her special as a canopy of safety; while it rains death on the enemy you are being protected at the same time. Not bad eh? When she fires her bow in midair, it creates a magical platform where she is suspended for a few seconds. Madoka can "store" a charge of the quick attack by jumping after charging it 1 or 2 levels. You can also store a charge by using a fully charged strong attack or just charging it to full and jump cancelling. If a quick attack is used next, it will have 1 level charged. Therefore, alternating between strong and quick attacks maximizes damage.
Homura
|
Homura |
||
|---|---|---|
 | ||
| Parameter | Base stat | Per level |
| Vitality | 88 | +4 |
| Power | 10 | +1 |
| Soul limit | 17460 | +102 |
| SL lost in revive | 16.5% | |
| Special cost | 50 | |
Homura is a ranged attacker who uses combinations of explosives and gunfire to attack. She's deadly and versatile, but has a very low soul limit and requires tactical play to set up combos.
Abilities:
- Quick Attack: Fire a rather weak handgun. Can be fired 7 times. Bullets will disappear before reaching full screen.
- Standing Strong Attack: M249 Machine gun. Fires 18 bullets. If used midair, the gun will change to a Howa Type 59 but do the same number of hits and damage. Will slow your fall in mid-air. Bullets do not disappear. Slightly pushes Homura back.
- Left/Right Strong Attack: AT-4. Fires one rocket that explodes on contact. The explosion has sizable splash AoE. Can be jump cancelled anytime after the rocket is fired. Firing the rocket pushes Homura back a little. May miss close grounded enemies. Only hits enemies and other destructible objects.
- Down Strong Attack: Jump and drop a pipe bomb that explodes on contact. The bomb bounces a bit before exploding on its own. Pushes Homura back a little. If used in the air, holding left or right will throw the bomb farther. Can be jump cancelled after the bomb is dropped.
- Up Strong Attack: Fires a mortar from behind at an upward angle. After traveling about screen height the shell arcs back down. The shell explodes when it contacts a surface, be it an enemy or part of the stage. Explodes on floating platforms on the way down. The explosion has sizable splash AoE. Can be jump cancelled any time after the mortar appears, even before it is fired, making this move effective for setting up high-damage combos.
- Up Strong Attack (mid-air): Small jump forward and throw a pipe bomb upwards that explodes on contact. The bomb bounces a bit before exploding on its own. Holding left or right will throw the bomb farther. If used during the rising part of a jump, Homura does the attack during the jump. If used during the falling part of a jump, Homura does an extra small jump and then the attack. This is Homura's only attack that cannot be jump cancelled.
- Special: Freeze time for a few seconds. During time stop you cannot be hit by enemies or their projectiles.
- Idle: The wind be blowing back and forward a lot.
Review/Tips: Homura is a great character to have for multiplayer. Not only does her special (time freeze) stack with other character's moves, but she has quite a few defensive maneuvers as well. While weak in the soul limit and life department, she does have the second fastest growth of soul limit per level. Though her Soul Limit is quite low and drains quickly, she makes up for it with fast projectiles and a time-freezing special.
Homura benefits greatly from being able to jump cancel almost all of her moves. Some examples of this are jump cancelling from 8X or 6X into rising 8X and then repeating when she lands, quickly filling the screen with explosive attacks while remaining highly mobile, or looping 5XC to fire her machine gun nearly without pause. The sheer number of explosives and bullets she can put on screen this way will have most enemies spending most of their time stunned and/or flying around the screen, unable to retaliate. Combine this with time stop and you're looking at very safe and damaging setups.
Homura rocket-cancel: Hold right or left direction then press X, followed by CX, and then another CX. If done correctly you should fire 3 rockets in one go. You can also use 8X or 2X on the final iteration to toss a grenade instead for lower lag time; 2X is good for retreating or spacing since it pushes you back a bit. Be careful not to press strong attack too soon after jump cancelling the first one, otherwise you will use the rocket launcher too close to the ground and you will land again before Homura can fire the rocket.
Mortar/Nade Spam: Hold up/right or up/left then tap XC repeatedly to rain down explosions to your enemies.
Mami
|
Mami |
||
|---|---|---|
 | ||
| Parameter | Base stat | Per level |
| Vitality | 110 | +5 |
| Power | 10 | +1 |
| Soul limit | 22278 | +84 |
| SL lost in revive | 14.8% | |
| Special cost | 100 | |
Mami is a hybrid melee-ranged fighter who is widely regarded as the most difficult character to play. Her muskets have a very short range, her damage is low, and her truly powerful move, Tiro Finale, turns an enormous amount of the health bar blue.
Abilities:
- Quick Attack: Summon and fire muskets in succession with very low range, but AoE damage. Can be pressed 8 times.
- Standing Strong Attack: Summon multiple muskets that each shoot once before disappearing.
- This move can be charged by holding down strong attack. Uncharged summons 4 muskets. The longer you charge it, the more muskets will appear for up to 19.
- The move can be charged indefinitely. When charging in the air you will not move. You can jump cancel this move at any time. Doing so before letting the Strong Attack button go will cause the summoned muskets to disappear without firing. If you jump cancel after letting go, however, the muskets will fire and then disappear like normal.
- Left/Right Strong Attack: Step forward and strike the enemy with muskets on both sides, followed by a strong musket shot on both sides. The musket shots hit far out in front and back of Mami will low horizontal range, but have strong knock back and surprisingly good vertical reach.
- Down Strong Attack: Jumps forward and sends out a cloth whip down and forwards. Hits multiple times with weak damage and knock back; good for holding enemies still. You can hold the button down to prolong the attack for a short while. Will not hold bosses down.
- Up Strong Attack: Mami fires cannons diagonally upwards to both sides. Does not hit directly above her, though it has good vertical range. Doing this attack on the ground while holding left or right will cause her to move in that direction and then fire.
- Down and jump: Dive downward and hit for no damage, but if she hits an enemy she will jump off.
- Special: Tiro Finale. Summons a very large musket and fires a strong laser. The attack can be continued by holding the special button down and can continue until the health bar is all blue. Hits 6 times without holding. Considering the subtraction from the health bar, this move is extremely risky, and is best used to punish bosses when they present an opening.
- Idle: I can almost see them! ALMOST! ALMOST!
Review/Tips: Mami has a sizable SL supply but takes a considerable hit when reviving as well (nearly double the cost of some other characters) making her large pool quite deceptive as you will see your reserves run dry if you are not careful. While extremely vulnerable if enemies get the upper hand, her evasion skills are unsurpassed. Jumping and shooting the rifle leaves her nearly invulnerable while floating airborne. Her hit box is near her feet at this state. The same goes for the dual cannon move which does big damage to boot. Her special is a boss killer but be aware you need to back up more since the gun takes up a large portion of the screen and only hits in front. I would say you need to back up nearly full screen distance for it to hit. Repeatedly jump-canceling her forward-strong attack allows her to advance across the screen while attacking. Using her up strong attack during the rising part of a jump causes her to do the attack during the jump. Using it during the falling part of a jump causes her to do an extra small jump and then the attack. This attack can be used as a third jump in tight situations. Also, a good way to do damage against high up or large enemies is to do an up strong attack on the ground, and then jump cancel it and do a rising up strong attack and repeat when you land. Using her down strong attack causes a quick jump forward, and if you cancel it right after the whip comes out with a jump, you can move forward quickly.
Sayaka
|
Sayaka |
||
|---|---|---|
 | ||
| Parameter | Base stat | Per level |
| Vitality | 138 | +6 |
| Power | 10 | +1 |
| Soul limit | 19935 | +82 |
| SL lost in revive | 6.2% | |
| Special cost | 20 (+20 to add Strong Attack) | |
Sayaka is a mobile melee fighter who uses charges and aerial attacks. She is an extremely powerful solo character whose diving attack can destroy enemies easily. Her strong attacks can chain into each other, making her extremely mobile while attacking.
Abilities:
- Quick Attack: Swing her sword back and forward. Can be pressed 8 times with the 8th being a step froward and slash.
- Standing Strong Attack: Lunging sword thrust forward.
- Chargeable up to two levels and can be held indefinitely. Charging increases damage and knock back. Fully charged will hit opponents all the way into the wall.
- Can be cancelled after the lunge forward into a jump or any other strong attack. Charging cannot be jump cancelled. If you charge this move in the air, your movement will be slowed drastically, but you will still move in the direction you were when you started charging and slowly fall back to the ground. You can continue charging even if you touch the ground before releasing the charge.
- Left/Right Strong Attack: Forward slash attack. Will knock back enemies all the way into the wall and cause them to bounce off.
- Down Strong Attack: Jump backwards and then diagonally dive attack the way you were facing.
- Up Strong Attack: Jump forward diagonally with a sword thrust. Can be done twice in a row. Beware of using this move in the air, it incurs a long recovery time.
- Down and jump: Dive downward and hit for no damage, but if she hits an enemy she will jump off.
- Special: Forward dash. Press Strong Attack during the dash to add a powerful attack with some extra cost to your bar. During the dash you do not take hit stun, but you can still take damage.
- Idle: Bouncy. Well, except for her chest. Why so flat, Sayaka?
Review/Tips: Sayaka is the definitive powerhouse that can tank it out with little to no effort. Her attacks are very strong and fast and is probably the most powerful character in the game (at least for lower Laps). Her left/right strong attack will stun enemies and send them flying into the wall. A good way to damage enemies, especially those on later laps with lots of hp, without fear of retaliation is to continuously hit them into the wall. This works on larger enemies, as well. Just hit them as they're bouncing off the wall to negate their super armor, and then the next hit will slam them into the wall, again. You have to really try hard to die on the first few laps of the game. I wonder what happens if she does die...
Kyouko
|
Kyouko |
||
|---|---|---|
 | ||
| Parameter | Base stat | Per level |
| Vitality | 95 | +5 |
| Power | 10 | +1 |
| Soul limit | 23742 | +87 |
| SL lost in revive | 12.5% | |
| Special cost | 35 | |
Kyouko is an offensively oriented melee fighter who has high damage attacks that cover wide areas. She is an extremely powerful solo character who can destroy waves of enemies easily in the early laps, but she can't handle taking very much damage.
Abilities:
- Quick Attack: Swing her spear. Can be pressed 8 times for 2 pokes and 6 swings. The swings have very good vertical reach.
- Standing Strong Attack: Lunging spear thrust forward.
- Chargeable up to two levels and can be held indefinitely. Charging increases damage and knock back. When fully charged the lunge will do great damage, hit enemies all the way into the wall, and go extremely far, around one whole screen length.
- Can be cancelled at any time into a jump or any other strong attack. Charging can also be jump cancelled. If you charge this move in the air, your movement will be slowed drastically, but you will still move in the direction you were when you started charging and slowly fall back to the ground. If you touch the ground before releasing the charge, the charge will be cancelled.
- Left/Right Strong Attack: Spinning double hit. The first swing has weak knock back, but the second swing will knock back enemies all the way into the wall and cause them to bounce off. Can be jump cancelled after the second swing.
- Down Strong Attack (grounded): Jump and slash down.
- Down Strong Attack (mid-air): Spear thrust diagonally downward. Pressing left or right will have her thrust in that direction.
- Up Strong Attack: Use her spear like a pole vault bending it and causing it to spring upward. Even in the air... Slashes in a large arc in front, over, and behind her.
- Down and jump: Dive downward and hit for no damage, but if she hits an enemy she will jump off.
- Special: Create a box shaped barrier around Kyouko comprised of small diamonds. Each diamond hits for 1 damage, stuns enemies, and disappears after hitting something.
- Idle: No Pocky?
Review/Tips: Kyouko is no pushover and is excellent at crowd control and melee combat. Her left/right strong attack grants invulnerability frames. Kyouko's up strong attack deals great damage and is particularly effective at evading attacks. It can also serve as another jump in a tight situation. Her mid-air down strong attack is her damage-dealer. After use she will pop up into the air slightly and is in position to repeat using it. Against bosses this is an effective way to do a lot of damage quickly. Her special has limited use, such as blocking enemies or projectiles, but usually hurts more than helps her because it ironically leaves this tank in a vulnerable state.
The most useful attack for Kyouko at lower laps is her up strong attack. This attack is her third strongest attack (behind fully charged strong attack and down strong attacks), covers an enormous area (including behind her), and can be spammed quickly, juggling enemies with ease. At lower laps, this attack will OHKO small enemies rendering even the largest crowds a trivial chore.
Kyouko combo: Z x5 + 5X + 6X + j2X + j2X or j8X
Stages
Gertrud
Gertrud boss fight
Small Anthony enemies (the ones with mustaches) spawn indefinitely during this boss fight. Gertrud, grounded, will slowly moves about the stage. She will alternate between these attacks at random:
- Body slam forward. Be careful, this move has farther range than it appears. Hits on the ground where her body impacts.
- Jump forward, up, or back and hit you where she lands. Only hits around her feet.
- Back up quickly and hit you by her feet. This is typically followed up by one of her other attacks.
- Jump straight up into the ceiling and position herself above where you are. After a time she will fall straight back down and do a body slam. Hits on the way down and on the ground.
- Send out a large scissor attack that has pretty far range in front of her. Both the scissors and the vines they're connected to can hit you.
- Summon Adelbert enemies (the small white enemies) from the ground at spaced intervals. These Adelberts cannot be hit while being summoned. After a brief time, the Adelberts will turn into spikes to form walls, at which point they can be hit and destroyed by any attack, even weak attack. After the summoning Gertrud will randomly do one of her attacks, often her ceiling jump attack. Like the Adelberts in the stage, after some time they will disappear on their own.
- Adelbert summoning:
- Adelbert walls:
- Adelbert summoning:


Strategies/Tips: Considering her attacks, it's pretty safe to do air attacks since most of Gertrud's attacks only hit near the ground. As mentioned above, the Adelbert enemies she summons can be destroyed in one hit by any attack, unlike those found in the stage, so you can easily destroy them and run away instead of being trapped waiting for her attack you with little room to dodge.
Charlotte
This stage is pretty linear like all the other stages but you'll come across a maze half way through, its best to follow the doors that have a blue hue(not the door color itself, but the light shining out of it) do this until you reach a room with the two staircases on either side, then head to the pink one(it should be after the one room filled w/ two giant rat enemies and their small minions). Though the game will take pity on you eventually and head you onward to the correct path, if you do mess up repeatedly. Though in later laps, it becomes beneficial to mess up and redo these rooms to grind for levels but this loop(the 2 big mice room and double staircase room) will only lasts four times, since starting the fifth one, the game will correct you to the path to Charlotte.
Charlotte boss fight
Charlotte initially appears in her first form and never moves or attacks you. To begin the true boss fight, you must defeat this first form. In the mean time, small enemies spawn indefinitely throughout the stage. Once you've defeated the first form, her second form appears from above in the center of the stage and bites downward. This can hit you for large damage. Don't be intimidated by her large size. The actual area where she can damage you is generally centered around her face when she attacks. She will alternate between these attacks at random:
- Bite forward and downward or upwards towards where you are.
- Jump forward and slams down on the ground in front.
- Charge up for a bit before moving forward for while, biting low at ground level or high at platform level toward where you are. High version can end with a body slam that hits the ground in front.
- She will back up several times, typically followed by another attack.
- Jump upward off the screen. She then appears above you and bites downward. This move is very powerful so do your best to avoid it.
Strategies/Tips: Considering her attack pattern, it is fairly safe to stay near her, as long as you're behind her. She backs up much faster than most of the characters can move, though, so when she does, it's usually best to stay away.
- On later laps, a good way to grind levels is to, during Charlotte's first form, ignore her and just attack her minions.
H.N. Elly (Kirsten)
Kirsten boss fight
The setting of this boss fight is different from usual. There's no ground, only six floating TV's, the bottom four of which you can use as platforms. Falling off a platform just causes you to fall through and then appear above where you fell. If you fall off the sides, you'll land on the side platforms. If you you fall through the middle, you will probably drift towards one of the lower platforms. You can fall indefinitely, and steer yourself using the left and right arrows. Kirsten takes the form of four TV's which constantly rotate in a circle at the center of the stage. The main body, and the only place she can be harmed, is the TV containing the blue silhouette. Green blood spurts out of the TV to show that you're doing damage. The other TV's will contain one of three different images that have different effects:
- Lightning - periodically shoots lightning outwards.
- Minion - periodically spawns small minions.
- Exclamation point - if this TV is hit, three electrical orbs will fly out.
Every so often, Kirsten and all the TV's will whirl around in place for a short time during which she's invulnerable. After, they will resume rotating with some changes:
- Kirsten's position amongst the TV's may change at random.
- The images on the other TV's may change at random.
- The direction that TV's rotate may change at random.
- The speed at which the TV's rotate may change at random.
- The TV's may change to rotate in a circle with a small diameter (all of Kirsten's TV's touching), a large diameter (the TV's can reach the platforms), or a medium diameter (half way between) at random.
Strategies/Tips: This fight is mostly made difficult by the spawning of enemies that will interrupt you while you try to attack Kirsten. Don't expend too much effort trying to take them out before attacking Kirsten, however, because it's likely that more will spawn before you get a chance to attack her if you pay too much attention to them. Unlike enemies throughout the stage, though, enemies that spawn from the TV's can be killed with one attack, be it weak or strong, so if you are close to an enemy you can take it out quickly before continuing your assault.
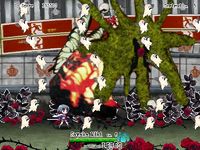
Elsa Maria
Elsa Maria boss fight
Elsa Maria is a grounded, generally stationary boss. She will only move after each attack where she will idle for a time before disappearing and reappearing again somewhere at random. Small and medium sized enemies of every kind from this stage will spawn at random indefinitely. She will alternate between these attacks at random:
- Hands extend out of her body and home in on you in a straight line.
- Hands extend straight out of her body at random angles and then turn once to home in on you.
- Note for the above two hand attacks, at low health she will do another volley of hands after the first.
- 12 hands extend straight out of her body radially at evenly spaced intervals like spokes of a wheel. At low health she will send out 16 hands so the space in between hands is smaller.
- Note that for all the hand attacks, only the hand can hit you, not the arm, so that's the only part you have to dodge.
- A large tree extends out of the back of her head and covers that entire side of the screen. This move is extremely powerful and hits many times. If you get hit by it, it will one hit KO you. An easy way to dodge this move is to pay attention to Elsa Maria's form when she appears. If it's any other attack, her body with morph into a blob like shape before attacking, But if it's this attack, her body will not change; the tree will just start extending out. This move also has fairly long start-up time, so it's not hard to get out of the way if you see it coming.

Strategies/Tips: Taking her OHKO move into account, it's safest to attack Elsa Maria from her front at all times. Her other attacks are best dealt with at a distance. The straight homing hands you can avoid by staying in place and then jumping over them as they approach. The angled hands you can avoid by keeping your distance at first and then running towards Elsa Maria as they approach. The hands will generally extend upwards before turning, and they will turn to aim where you are, so if you continue moving forward they should miss you. The radial hands you need to look for an opening between the hands. And the tree you can avoid completely simply by being behind it. She will never appear so close to the edge of the screen that you can't avoid it.
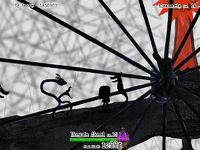
Oktavia von Seckendorff
You obtain this boss fight after Sayaka dies at any time. There are no enemies present on this stage except Oktavia.
Oktavia boss fight
This is the only boss fight where enemies don't spawn. Oktavia will slide back and forth across the stage. She will alternate between these attacks:
- Summon four wheels that bounce across the screen from behind her. This occurs when Oktavia turns sideways, leans back, and raises both her arms high. These wheels are destructible, and hitting them delays their descent.
- Summon many wheels in the sky that, after a short time, fall straight down and then, after a short time, roll off to the sides. This occurs when Oktavia raises only her sword arm. These wheels are destructible, but cannot be hit while they're in the air. Hitting them on the ground will stall their forward rolling.
- Dash very quickly around the stage. She doesn't attack during this, nor is she invulnerable.
- Big sword slash that causes a large shockwave along the ground that goes in both directions from the impact of the sword. The sword slash can hit you. Both the slash and the shockwave do tremendous damage and will one hit KO you. The shockwave, though, only hits near the ground, so you can jump or stall in the air to avoid it. Try to be behind her or far from her when she does this move to avoid getting hit by the slash. An indicator that she's about to use this move is if he raises her sword arm and slides back and forth quickly.
- Retreat to the background where she is invulnerable and summon wheels to fall straight down randomly from the sky. The wheels will disappear after hitting the ground once. After many wheels fall, she will return to the foreground.
Strategies/Tips: A good way to dodge the bouncing 4 wheels is to try and keep your distance and then run to stand under the wheels' bounce. The wheels bounce very high, so it's not a good idea to try and jump or stall in the air over them. On the other hand, a good way to dodge the second wheel attack is to get out of the way of where they will fall while they're spawning in the air, and then jump or stall in the air over them as they roll off to the sides. If you want to go about destroying the wheels during the second wheel attack, keep in mind that, as mentioned before, the wheels during this attack can't be hit in the air, only on the ground. The last wheel attack where she's invulnerable can be dealt with by simply running back and forth to dodge. You can also try destroying the wheels with upward aimed attacks since they can be destroyed in one hit by any attack. Kyouko's super has very good application here. Any wheel will be destroyed if it touches her barrier. Two uses is enough to be safe for the entire duration of this move; one use will last a little short of the whole time. Even on later laps (tested up to lap 1000) this is still applicable.
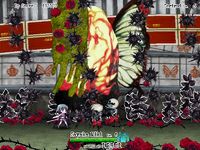
Walpurgisnacht
Walpurgisnacht boss fight
- This is another boss fight where there are platforms instead of solid ground. Unlike Kirsten's fight, though, if you fall here you die. Again, enemies spawn indefinitely. Walpurgisnacht has 2 main phases of attack.
- In her first phases she will float about the stage in random directions and let her minions attack you. Periodically a group of six blue orbs will appear in a hexagon formation randomly around the stage and fire blue lasers out radially. The lasers are the same as the ones her minions fire and will first shoot a thin beam showing the direction they will shoot before actually shooting, so you have some time to dodge.
- After some time, Walpurgisnacht will enter her second phase. During this phase she retreats to the background and she is completely invulnerable. If you have not destroyed her enemies they will remain. However, during this phase they will not re-spawn once killed. To start this phase, debris will fly up and then fall from the sky, rotating as they fall. The debris cannot be destroyed so you must dodge. Each piece does large damage. After the debris finishes falling, Walpurgisnacht will shoot fire from her mouth that covers large portions of the stage as it arcs about. Keep in mind, though, that it can only hit you when it passes through the foreground. This fire is very powerful. A good strategy is to wait at the top platform in the center of the stage so you can watch the fire and see which direction it will move in so you can effectively dodge. After the fire attack finishes, Walpurgisnacht will return to the foreground and resume her first phase. At low health, after the fire attack, she will drop an enormous building from the sky centered where you are. You will know it's starting when the screen shakes. This move is a one hit KO, but it's not too hard to outrun. Also, Sayaka can super dash away, while Homura can stop time.
Strategies/Tips:
- Walpurgisnacht is enormous, so it's extremely easy to hit her. Using Madoka's super attack can result in all of the arrows hitting for enormous damage.
Trophies
- Silver Trophy: Clear game once
- Silver Trophy: Clear the game without any downs (Deaths?)
- Obtain all endings
- Silver Trophy: Use everyone a total of 100 times
- Silver Trophy: Use Madoka a total of 100 times
- Silver Trophy: Use Homura a total of 100 times
- Silver Trophy: Use Mami a total of 100 times
- Silver Trophy: Use Sayaka a total of 100 times
- Silver Trophy: Use Kyouko a total of 100 times
- Gold Trophy: Use everyone 100 times each
- Silver Trophy: Defeat 1000 familiars
- Gold Trophy: Defeat 10000 familiars
- Silver Trophy: Defeat 100 witches
- Gold Trophy: Defeat 1000 witches
- Silver Trophy: Reach level 30
- Gold Trophy: Reach level 99
- Silver Trophy: Use magic ability 100 times
- Gold Trophy: Use magic ability 1000 times
- Silver Trophy: 100 hit combo
- Gold Trophy: 500 hit combo
Endings
The game has multiple endings depending on which characters in your party are alive at the end of the game. Getting all of the endings is a of requirements of one of the trophies. Currently identified ones and their conditions are as follows:
Ending 1: All of your party members survive.
Ending 2: Only Madoka and Homura survive.
Ending 3: Only Sayaka and Kyouko survive.
Ending 4: Only Mami survives.
Ending 5: Only Madoka and Sayaka die.
Ending 6: Only Sayaka dies.
Ending 7: Only Mami dies.
Ending 8: Only Kyouko dies.
Ending 9: Only Madoka dies.
Ending 10: Default ending when one of the other endings doesn't occur. Example ways to get this ending:
- Only Homura dies.
- Only Homura and Madoka die.
- Only Homura and Kyouko die.
- Only Madoka and Mami die.
- Only Madoka and Kyouko die
- Only Mami and Sayaka die.
- Only Mami and Kyouko die.
- Only Kyouko and Sayaka die.
- Only Madoka and Mami survive.
- Only Madoka and Kyouko survive.
- Only Madoka and Sayaka survive.
- Only Homura and Mami survive.
- Only Homura and Kyouko survive.
- Only Homura and Sayaka survive.
- Only Mami and Kyouko survive.
- Only Mami and Sayaka survive.
- Only Homura survives.
- Only Kyouko survives.
- Only Sayaka survives.
- Only Madoka survives.
System Requirements
- OS: Windows 7, Vista, or XP
- CPU: 2GHz or higher
- RAM: 1GB
- Hard drive space: 1GB
- Graphics: DirectX9.0c compatible with 256MB VRAM
- Display: 800x600 resolution
- Input Device: Game pad recommended, keyboard supported
Gallery
Illustrated by Asato Mizu

Cover

Stage Select screen
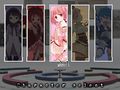
Character Select screen

Everyone survives

Only Homura and Madoka survive

Only Kyoko and Sayaka survive

Only Mami lives

Only Madoka and Sayaka die

Only Sayaka dies

Only Mami dies

Only Kyoko dies

Only Madoka dies

Homura in hospital, conditions variable


